
参考链接
https://developer.nvidia.com/ffmpeg
Getting Started with FFmpeg/libav using NVIDIA GPUs

操作系统基础环境


yum -y install epel-release
yum -y install gcc gcc-c++ cmake bzip2 vim kernel-devel kernel-headers
yum -y install yasm
注:标红的是必须装的。
安装nvidia显卡驱动
https://www.nvidia.cn/Download/index.aspx

注:Operation System这里一定选“Linux 64-bit”,不能选“Linux 64-bit RHEL7”。

下载得到NVIDIA-Linux-x86_64-440.33.01.run
./NVIDIA-Linux-x86_64-440.33.01.run –kernel-source-path=/usr/src/kernels/3.10.0-1062.12.1.el7.x86_64/
一路ok安装即可。
安装完成使用nvidia-smi测试下看是否能够识别显卡。

安装cuda
https://developer.nvidia.com/cuda-downloads

运行./cuda_10.2.89_440.33.01_linux.run安装
accept即可
取消选中Driver。(因上面我们已经装过驱动了,而且如果使用这个地方的驱动是不可用的,识别不了显卡)

将cuda的bin目录添加到path路径中:
vim ~/.bashrc
export PATH=/usr/local/cuda/bin:$PATH
source ~/.bashrc
安装nv-codec-headers
从https://github.com/FFmpeg/nv-codec-headers/releases下载
tar vxzf nv-codec-headers-n8.1.24.11.tar.gz
cd nv-codec-headers && make install
添加ffnvcodec的pkgconfig路径
vim ~/.bashrc
export PKG_CONFIG_LIBDIR=/usr/lib64/pkgconfig:/usr/share/pkgconfig:/usr/local/lib/pkgconfig:$PKG_CONFIG_LIBDIR
source ~/.bashrc
安装libx264
先安装nasm(需2.13版本以上,不能安装yum源里的2.10)
从https://www.nasm.us/pub/nasm/releasebuilds/2.14.02/下载nasm
wget https://www.nasm.us/pub/nasm/releasebuilds/2.14.02/nasm-2.14.02.tar.bz2
tar vxjf nasm-2.14.02.tar.bz2
cd nasm-2.14.02 && ./configure && make && make install
git clone https://code.videolan.org/videolan/x264.git
cd x264
./configure –enable-shared
make
make install
将libx264的库移动到/usr/lib64下
cp /usr/local/lib/libx264.* /usr/lib64
安装ffmpeg
从http://ffmpeg.org/download.html#releases下载ffmpeg
wget http://ffmpeg.org/releases/ffmpeg-4.1.5.tar.bz2
tar vxjf ffmpeg-4.1.5.tar.bz2
cd ffmpeg-4.1.5
./configure –enable-libx264 –enable-gpl –enable-cuda-sdk –enable-cuvid –enable-nvenc –enable-nonfree –enable-libnpp –extra-cflags=-I/usr/local/cuda/include –extra-ldflags=-L/usr/local/cuda/lib64
make -j 10

H264软(libx264)/硬(h264_nvenc)编码测试
将win7系统自带的示例视频Wildlife.wmv(动物那个)拷贝到本环境下,使用ffmpeg转成yuv格式,用于后面使用H264软/硬编码的视频源数据。
./ffmpeg -i /root/Wildlife.wmv /root/Wildlife.yuv
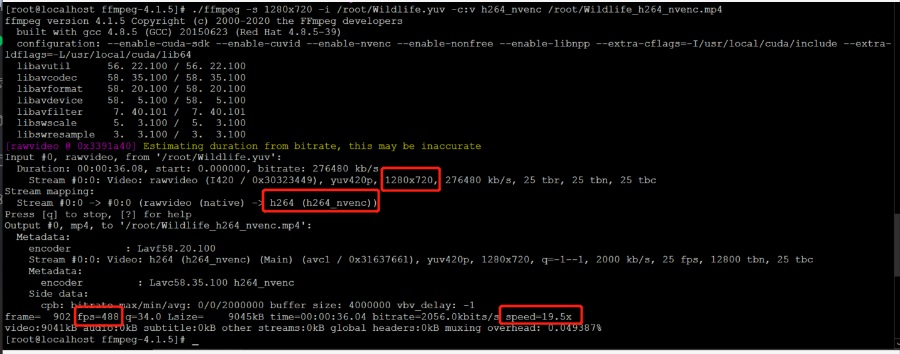
./ffmpeg -s 1280×720 -i /root/Wildlife.yuv -c:v h264_nvenc /root/Wildlife_h264_nvenc.mp4
./ffmpeg -s 1280×720 -i /root/Wildlife.yuv -c:v libx264 /root/Wildlife_libx264.mp4
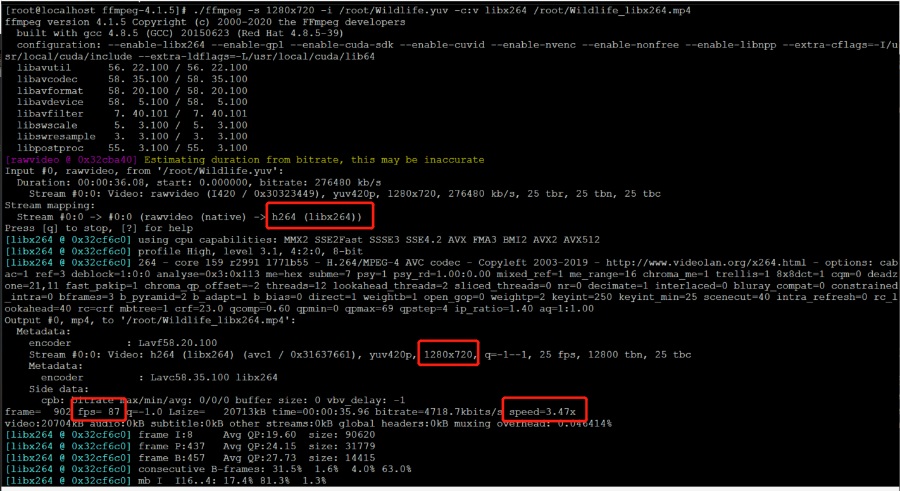
本次测试用的服务器CPU型号为Intel Xeon W-2125,主频比较高,为4.0GHz。通过对比测试,本硬件配置下,Tesla P4 H264硬编码的速度是采用libx264软编码的5-6倍。